How to Hide and Make Photos Private on Facebook: Step-by-Step Guide
Sharing photos on Facebook is a popular way to connect with family and track friends' locations in real-time, but it's important to protect your personal information.
Sharing photos on Facebook is a popular way to connect with family and track friends' locations in real-time, but it's important to protect your personal information.
Learning how to keep pictures private on Facebook empowers you to dictate who can view your memories. Whether you aim to hide photos on Facebook from public, restrict visibility from certain friends, or completely lock down your photo library, this article is about these important aspects.
You'll confidently know how to make your pictures private on Facebook and feel secure with your custom privacy settings, regardless of Facebook's ever-changing interface.

How to Make Your Pictures Private on Facebook
Facebook's privacy settings have undergone significant transformations over the years, making it important to stay informed about the latest changes. These modifications directly affect how to make pictures on Facebook private.
Grasping how to make all pictures private on Facebook begins with a clear understanding of these visibility tiers. It's also helpful if you ask yourself: how can I make my pictures private on Facebook.
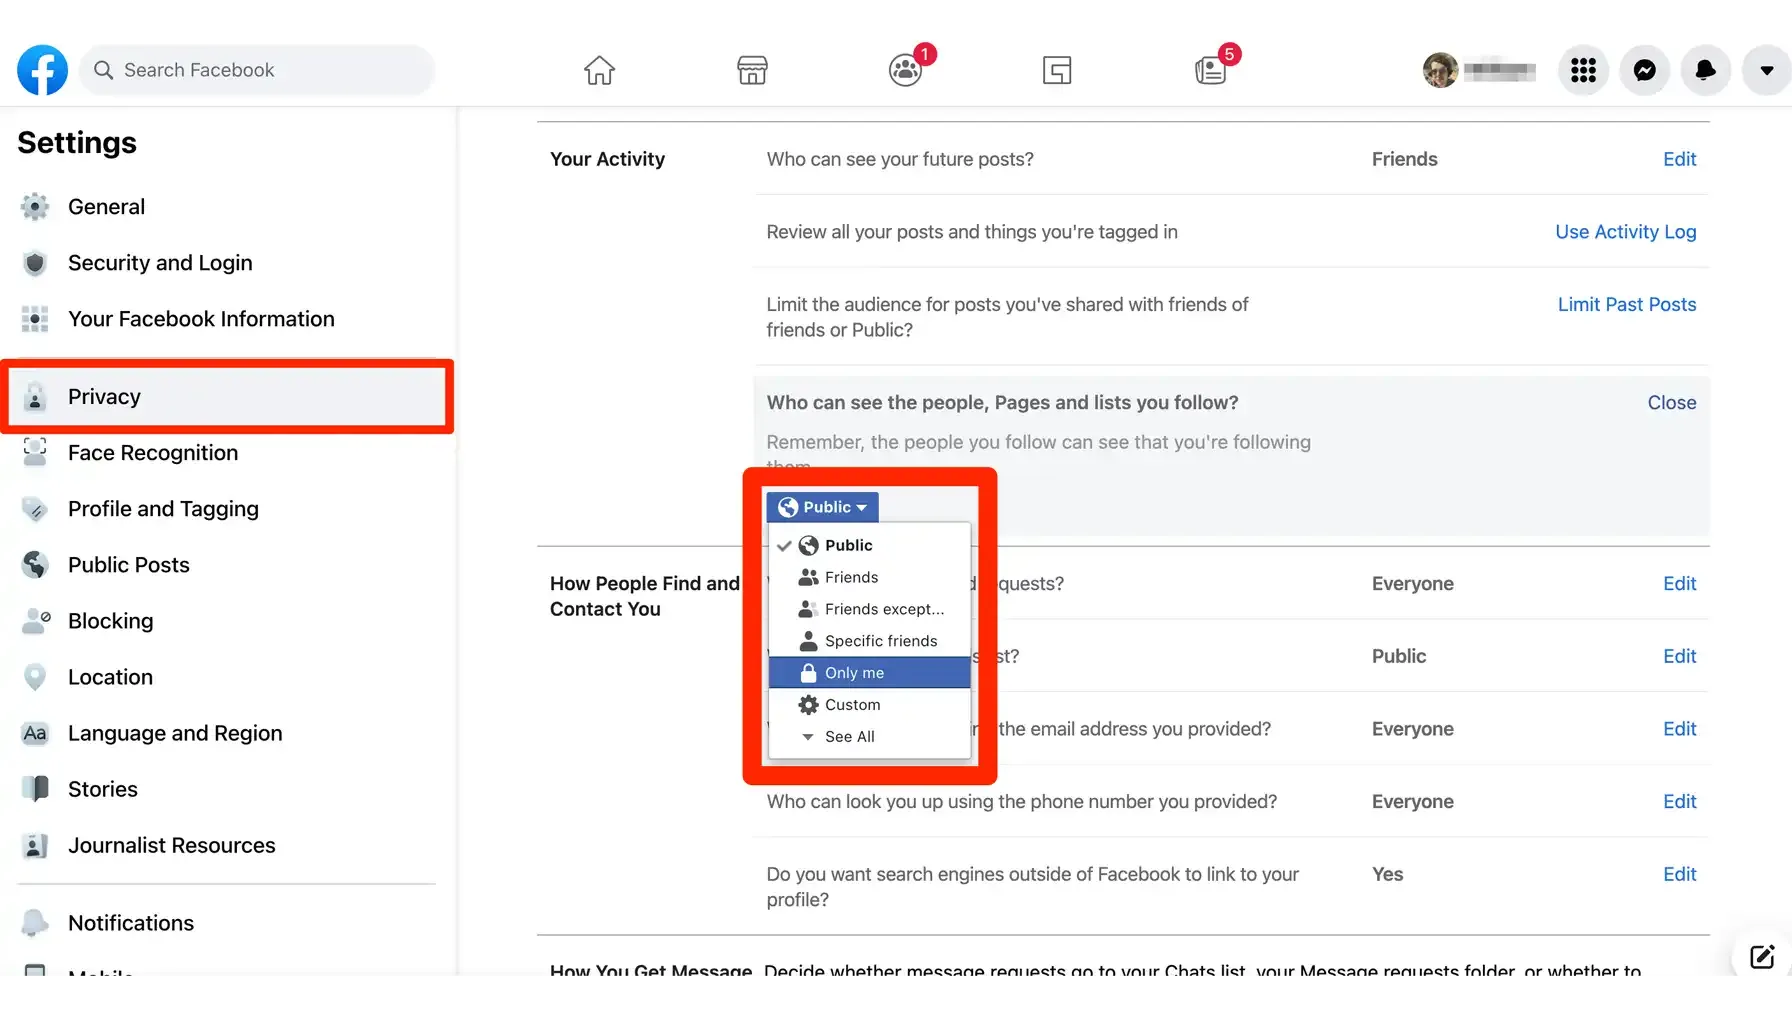
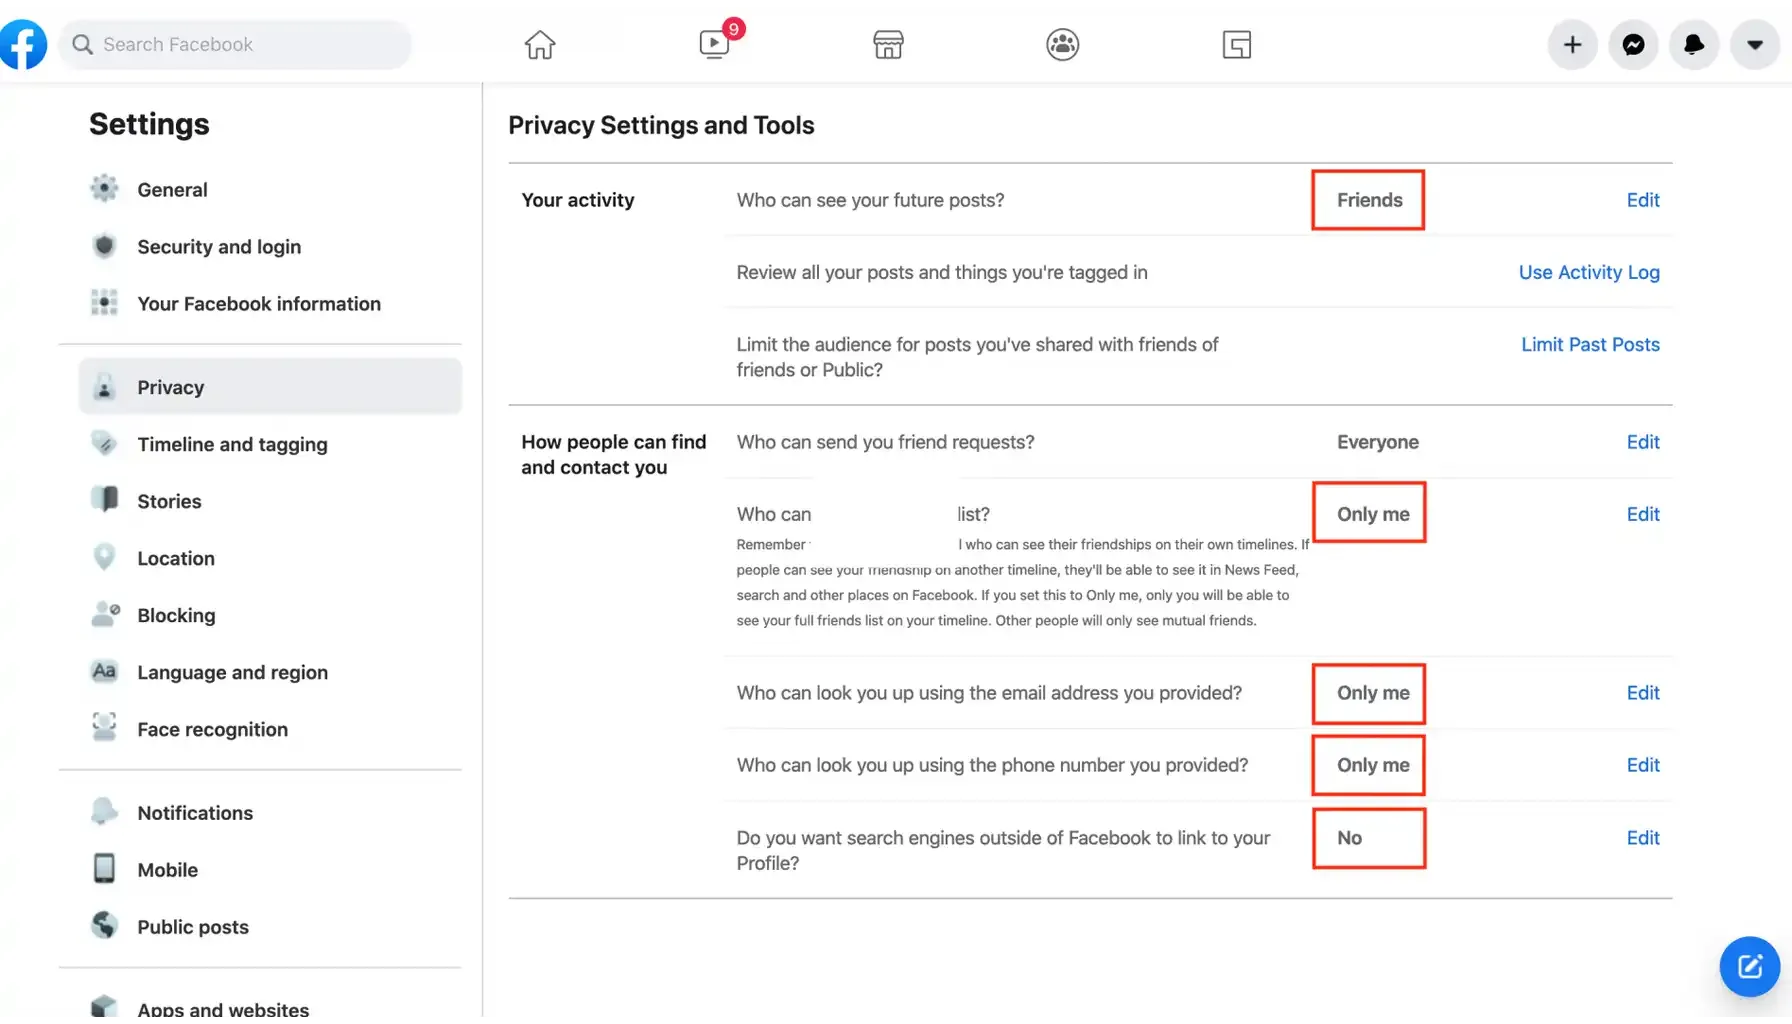
To locate your privacy settings, navigate to the "Settings & Privacy" section within the Facebook menu, typically found by clicking the downward-facing arrow in the top-right corner of the screen.
From this hub, you can fine-tune a multitude of options, including who can view your posts, control access to your profile information, and, of course, manage the privacy of your photos and albums.
Mastering how I do make my pictures private on Facebook hinges on becoming intimately familiar with this essential settings area. If you cannot find this section, Facebook support should be able to assist you with directions to the area on their platform.
These privacy settings constitute your primary defense against unauthorized access to your personal data. They empower you to meticulously control who can see your content, thereby preventing unwanted access, misuse of your images, and potential privacy breaches.
Knowing how to make your pictures on Facebook private is not merely a convenience; it's an essential component of safeguarding your digital identity and maintaining control over your online narrative. Furthermore, consider enabling two-factor authentication for an additional layer of security on your account.
How to Make All My Pictures Private on Facebook
Step 1 | Navigate to your Facebook profile page. |
Step 2 | Click on the "Photos" tab, typically located below your cover photo. |
Step 3 | Select the "Albums" option to view a list of all your photo albums. |
Step 4 | For each album you wish to make private, click the three horizontal dots located in the upper-right corner of the album preview. From the dropdown menu, select "Edit." |
Step 5 | Within the album's editing interface, locate the audience selector, which will likely display an option like "Public" or "Friends." |
Step 6 | Click on this selector to reveal a list of audience options. Choose "Only Me." |
This method will work effectively for the question: how to make all your pictures private on Facebook. It ensures that only you have the ability to view the photos within those albums. Repeat this process for each album you wish to keep private.
How to Make Profile Pictures Private on Facebook
Profile and cover photos are highly visible, often the first impression you make. Controlling who sees them is very important. You might be interested in limiting visibility for various reasons, even if you search for someone on Facebook Dating. Knowing how to make profile pictures private on Facebook puts you in control of your public image.
Step 1 | Access your Facebook profile page. |
Step 2 | Click directly on your profile picture to open it in full-screen view. |
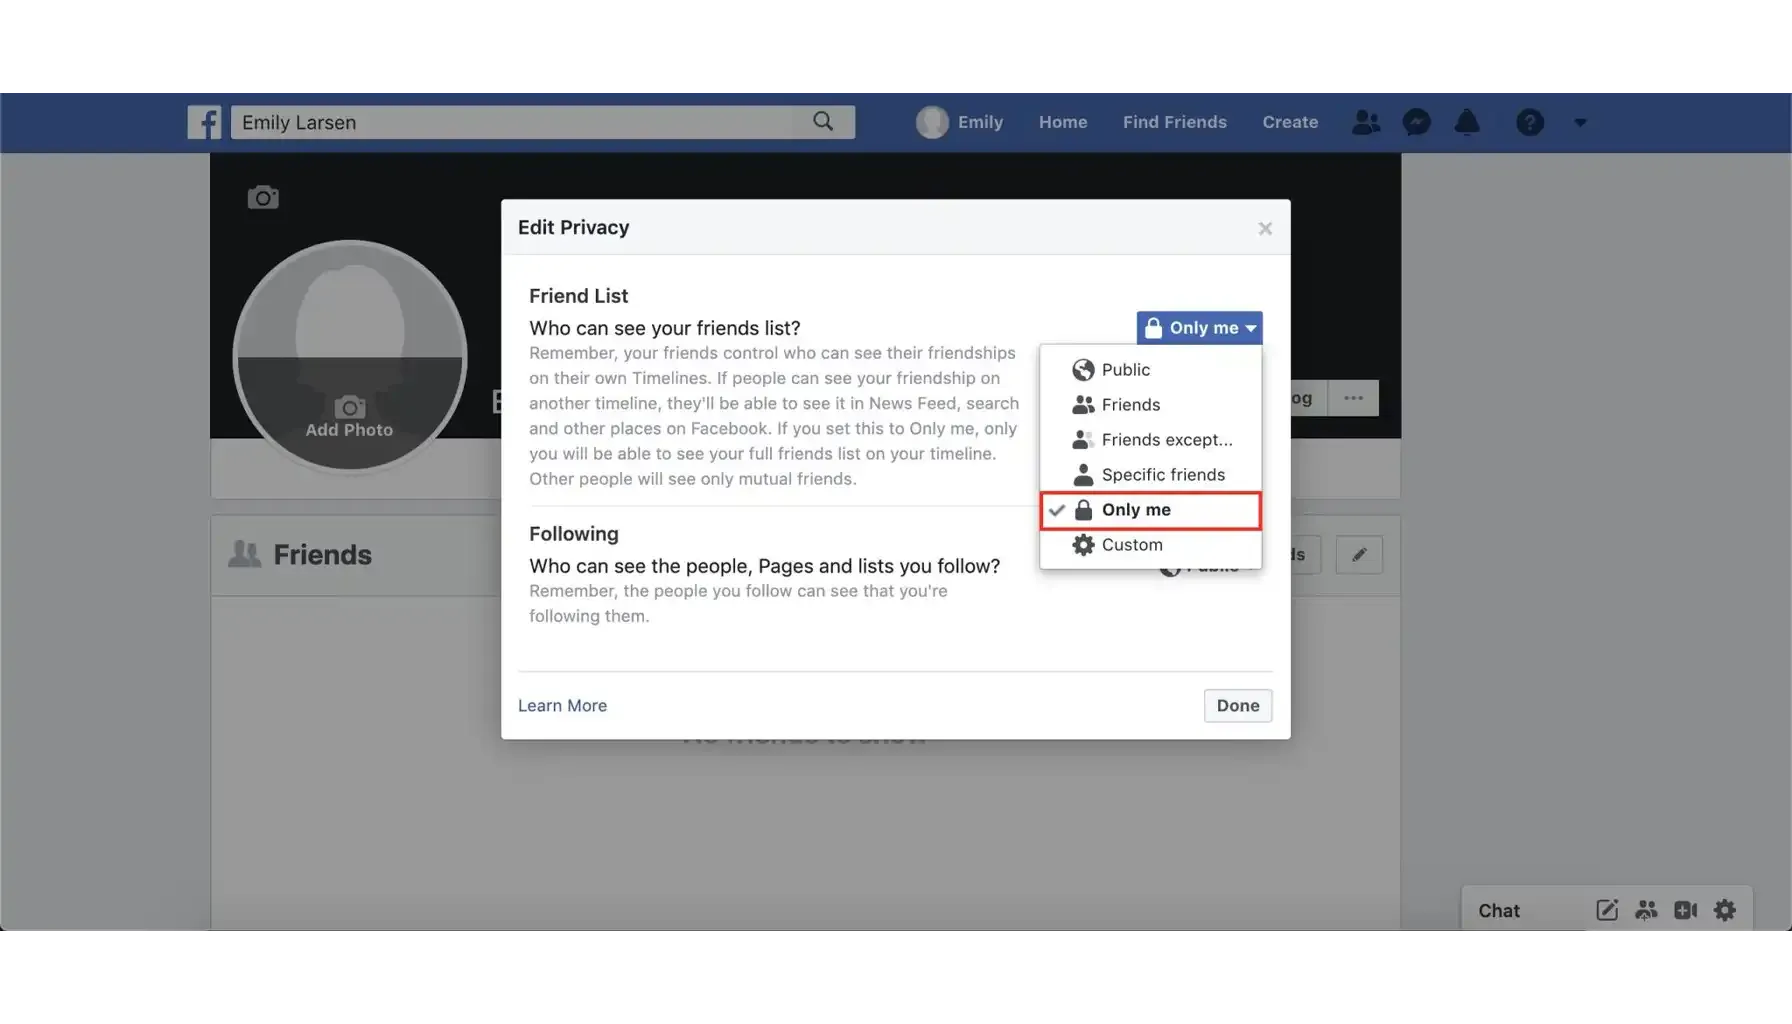
Step 3 | In the lower-right corner of the photo, locate the three horizontal dots and click them to reveal a dropdown menu. Select "Edit Privacy." |
Step 4 | From the presented audience options, choose "Only Me." |
This does not mean you are failing to know how to hide photos on Facebook from public, only that a smaller version may still be displayed.
How to Hide Photos on Facebook From Public
If your objective is to hide photos on Facebook from public, you can fine-tune the privacy settings for individual posts containing photos.
This approach provides granular control, enabling you to decide how to hide photos from public on Facebook on a case-by-case basis.
Step 1 | Locate the specific post on your timeline that contains the photo you wish to hide from public view. |
Step 2 | Identify the audience selector, typically located near the date and time of the post (e.g., "Public," "Friends"). Click on this selector to display a list of available audience options. |
Step 3 | From the list, choose either "Friends" or "Only Me," depending on your desired level of privacy. |
Examples of specific audience choices include "Friends except..." which allows you to exclude particular friends from seeing the post, and "Specific Friends," which grants visibility only to a select group of individuals.
Consider carefully who you want to grant access to your photos and tailor your audience selections accordingly. While it's important to protect your privacy, be aware that there are always potential security threats, so make sure to never look for how to hack Facebook Messenger or visit any dubious websites.
Managing Tagged Photos
Numerous reasons may lead you to want to hide tagged photos on Facebook. Perhaps you dislike the unflattering nature of the photo, or maybe you prefer to maintain control over the narrative and context surrounding it.
How to Hide My Tagged Photos on Facebook
Step 1 | Access your Activity Log. This can typically be found by navigating to "Settings & Privacy" from the downward-facing arrow menu and then selecting "Activity Log." |
Step 2 | Within the Activity Log, locate and click on the "Photos You're Tagged In" section. |
Step 3 | Select the specific photos that you wish to hide from your timeline. |
Step 4 | After selecting the desired photos, click on the "Hide from Timeline" button. |
You will remain tagged in the photo, and it may still be visible in other contexts, such as the poster's timeline or in search results. You can also request for the photo to be untagged.
How to Hide All Tagged Photos on Facebook
While Facebook does not offer a single-click option, you can leverage the Activity Log to manage them in bulk. Simply select multiple photos at once and hide them from your timeline in a single action, streamlining the process.
Be mindful of the information you share on the platform, and consider the privacy implications of being tagged in photos, especially if you utilize location-based apps. Consider, for example, if you are using the Number Tracker app, your friend can know your location.
How to Hide Photos From Friends on Facebook
Step 1 | To only show the photos to some specific friends, use the "Specific Friends" option in the privacy settings of the tagged photo. |
Step 2 | Or use the "Friends except" option in the privacy settings of the tagged photo, to choose whom to exclude from seeing the photo. |
Step 3 | Or use the "Only me" option in the same setting, so that only you can see that tagged photo. |
Album Visibility
Facebook albums provide a convenient way to group your photos together, and you retain complete control over their visibility. If you are wondering how to make pictures private on Facebook by effectively managing your albums, here's a detailed guide.
Access your Facebook profile and click on the "Photos" tab.
Click on the "+ Create Album" button.
Provide your album with a descriptive title and, optionally, a detailed description.
Most importantly, set the audience for the album to either "Only Me" or "Friends," depending on your desired level of privacy.
For instance, you might create a "Family" album visible exclusively to your family members, while a "Travel" album could be shared with a wider circle of friends.
Privacy Management
Schedule periodic reviews of your current privacy settings. Facebook's interface and privacy policies are subject to change, so staying updated is essential.
Avoid searching for terms like finding someone’s address, as engaging in such activities could lead to legal issues or expose your own personal information to risk.
Stay informed about any modifications or updates to Facebook's privacy policies and features. Subscribe to relevant news sources and monitor Facebook's official announcements.
Exercise mindfulness when sharing content on the platform, and meticulously consider the impact of future publications on your privacy. Before posting anything, ask yourself who you want to see it and what potential repercussions it might have.
Related Number Tracker Articles
Real-time GPS tracker